
TOS Secrets
by Wojciech Jabłoński, Jacek Trojański
Most of the information contained here has been obtained empirically by analyzing machine code for many hours. Therefore, part of the described procedures and system variables have no names. If you have already used them and created your nomenclature for this purpose, you can fill in the blank spaces in the tables.
Due to the low usefulness of BASIC, good knowledge of the use of monitor and assembler programs is required, and all addresses are given in hexadecimal.
Three words about the system:
The TOS disk operating system (Timex Operating System) is used to operate the ZX Spectrum or Timex computer, connected via an interface with the Timex FDD 3000 disk drive.
The floppy drive includes a controller, power supply, and floppy drives. [There are two types of housing – one consists of three modules, and the other is one housing with space for two 3 “drives. The Controller includes a Z80A processor, ROM, 64 KB of RAM, a disk driver, and I / O chips. It is actually a separate computer. The interface consists of a 4KB ROM, 1KB RAM, and a chip electronic responsible for “addresses and contacts”.
Most of the TOS code is loaded during boot from a floppy disk and occupies the first 16 KB of RAM in the floppy disk drive controller. [In fact, the fixed code is 10kB, one of the 2kB overlays, and the rest is for buffers. It supports RS232C connectors and disk drives. The remaining 48 kB is free. The part responsible for the existence of new instructions in BASIC is in the ROM of the interface.
How does the interface work?
The aforementioned electronic system contained in the interface reacts to the appearance of three specific addresses on the address bus. At the time of detecting the execution of a program with the address #0000 or #0008, it disconnects the standard Spectrum ROM and reconnects the ROM and RAM of the interface in its place.
This process is referred to as “interface wakeup” hereinafter. After finding the address #0604 the opposite occurs.
Fig. 1 – Computer memory map before and after activating the interface.
Thanks to this structure, TOS can control the computer when it is restarted (RST 0; program named “START” is loaded), or when handling a syntax error (RST 8; asterisk, i.e. new instructions).
For handling the interface memory, incomplete addressing is used, as a result of which it is visible in several places at once. [Except for TI-of-TTL which has fully
addressed a sufficient amount of memory. The interface with a gate array logic layout is very easy to convert to 2kB RAM.]
When programming, it must be remembered that the screen memory is physically in contact with the RAM area of the interface.
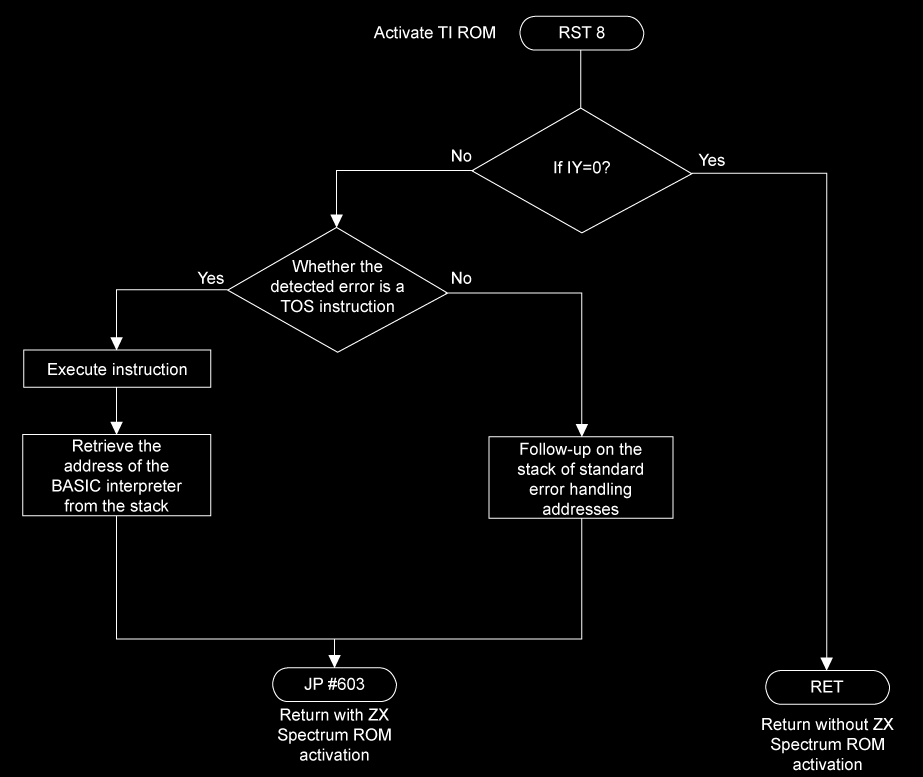
Figure 2 – General algorithm for handling RST 8 calls through the interface.
First steps
The creators of the TOS system wrote it very friendly and left a few gaps for programmers. It is clearly visible in the presented algorithm (Fig. 2.). It is not normal that when calling RST 8, the IY register is zero – in BASIC it is not possible – so the reaction to it is special, i.e. the RET command. [Normally IY points to the BASIC variable region. Thanks to this structure, you can easily activate the interface by calling the following subroutine:
DR_ON PUSH IY ; storage of the contents of the IY register
LD IY, 0 ; load tag
RST 8 ; interface activation
POP IY ; restore the contents of the IY register
RET ; return
The DR_ON routine does not change the contents of registers and the only result of its operation is the conversion of the computer’s ROM to the interface memory and the disabling of masked interrupts. It is a staple of most programs, and its name will be repeated many times over.
The computer’s ROM is now invisible and it is impossible to use its routines directly. The memory structure is shown on the right side of Figure 1, with a more detailed description you will find in the tables. Reactivation of the ZX Spectrum ROM is carried out, as already known, by executing the command from address # 0604. His neighborhood looks like this:
#0603 EI ; enable masked interrupts
#0604 RET ; return and activate computer ROM
So you can see that the standard ROM can be enabled in two ways: by jumping to # 0603 with interrupts enabled, or to # 0604 without enabling nonmaskable interrupts.
Interface RAM (Table 1)
The first 256 bytes of the interface RAM are used as the buffer. All data transmitted to and from the disk drive travels through this area.
The next 82 bytes are system variables. From the programmer’s point of view, the most important are those that are labeled in the table. In addition, the area from
#210D deserves mention to #212C where the error message is stored, and address #213A containing system status flags. The latter is only set when executing TOS instructions,
the remaining time they are zero and most of them are of no practical importance to us. Only bit 0 can be used: its setting causes the next call of RST 8,
it will work like the DR_ON procedure.
The remaining 684 bytes are free and you can put your program there. Although the instruction attached to the floppy drive says that the free memory starts with the address
#2156, practice shows that the last used byte for system variables is # 2153.
TABLE 1. RAM (# 2000- # 23FF), (# 2400- # 27FF), (# 2800- # 2BFF), …
| Address | Name | Lenght | Description |
| #2000 – #20FF | bufdat | 256 | Data buffer |
| #2100 | mod | 1 | The number of the operation to be performed |
| #2101 – #210C | 12 | Contents of processor registers when sending the command, successively: AF, BC, DE, HL, IX, IY | |
| #210D – #212C | 32 | Error message text | |
| #212D | 1 | Number of header bytes for SAVE or LOAD operations | |
| #212E | chan | 1 | Channel number |
| #212F | 1 | Header for communication between the computer and the disk drive = block type: #CO-connection, #DO-buffer | |
| #2130 | 1 | Header for communication between the computer and the disk drive = length of the block to be transferred | |
| #2131 | 1 | Header for communication between the computer and the disk drive = marker for sending correctness: #BO-OK, #EO-error | |
| #2132 | 1 | Number of block transfer attempts | |
| #2133 | 1 | Type of file being written or read (DATA, CODE, etc.) | |
| #2134 – #2139 | 6 | Work variable area; they have different functions depending on the command being executed. | |
| #213A | 1 | System state markers; setting the appropriate bit means: 0-the system will execute the RET command at RST 8, 1-the analyzed command is correct, 2-syntax analysis, 3-record length is given, 5-getting numbers from a stack | |
| #213B | finit | 2 | Address of the error handler call procedure when the error in question is not a TOS instruction. Standard #0082. By giving the address of your own procedures, we can expand the list of orders. |
| #213D | 2 | Address of the BASIC return procedure after the TOS instruction has been executed. Standard #06E3 (not to be confused with # 0603) | |
#213F | 2 | Stores the initial value of the CH_ADD system variable during parsing | |
#2141 | 2 | To temporarily store the value of DE while calling the CBAS routine | |
| #2143 | 2 | Not used | |
| #2145 | prolen | 2 | Length of the block being read or written |
| #2147 | prostr | 2 | Address of the block being read or written |
| #2149 | 2 | Address of the string variable | |
| #214B | 2 | The length or number of the record | |
| #214D | filetype | 1 | The type of block to write |
| #214E | filelen | 2 | The length of this block |
| #2150 | start | 2 | The starting address of this block |
| #2152 | 2 | For LOAD – the length of the BASIC program | |
| #2154 – #23FF | 684 | FREE MEMORY |
Interface ROM (Table 2)
To be able to view the ROM, you must run the runway and transfer its contents to the computer’s operating memory. There you can already use the monitor program.
The easiest way is to write SAVE * “ROM” CODE 0,4096: LOAD * “ROM” CODE 32768. A more elegant solution is a short machine program:
CALL DR_ON ; activate the interface
LD HL, #0000 ; first address
LD DE, #8000 ; to
LD BC, #1000 ; how many
LDIR ; moving the ROM content to the address # 8000
CALL #0603 ; activate the standard ROM
RET ; return
; instead of the last two commands JP # 0603 can be used
A detailed knowledge of the ROM is not necessary to be able to use it, but I think it is worth taking a look at a few places. You have to see for yourself what the RST 8 operation actually looks like. It is also instructive to decipher how the procedure works from address #031D (look for #831D !!). Above all, however, you need to see what is in the area #0605 – #0628 (now #8605 – #8628). You just need to know it well and then you can do practically everything in the TOS system – from recording programs to accessing the station’s memory. Just in month
TABLE 2.ROM (# 0000- # 0FFF) and (# 1000- # 1FFF)
| Address | Description |
| #0000 – #0007 | Jump to boot routine |
| #0008 – #031C | Support for EST 8 call, parsing tables and routines |
| #031D – #0363 | Procedure for calling programs from computer ROM |
| #0364 – #03D7 | Higher level communication routines; transferring a buffer or a command to and from a floppy drive |
| #03D8 – #0494 | Error handling routines; printout of messages, testing of the BREAK key, return to BASIC |
| #0495 – #05BD | Lower level communication routines; forwarding blocks and single bytes |
| #05BE – #0602 | Name of the file loaded at system startup – “START” |
| #0603 – #0604 | Disconnect ROM interface, with or without interrupts |
| #0605 – #0628 | Jump table to more important subroutines |
| #0629 – #0EE0 | Subroutines that execute particular TOS instructions |
| #0EE1 – #0FFF | Boot routine and the text “© TIMEX – TOS A.2” |
TOS without secrets part. 2
In the second and third parts of the article, we will deal with the jump table in the ROM interface. It begins with address # 0605 and is twelve hops consecutively to virtually all usable operating system routines.
There is some reason to refer to the jump table instead of directly to the addresses of the called procedures. It ensures the compatibility of the written program with the new operating system versions. A possible new interface ROM must follow the same procedures, but they can be in completely different places. [E.g. the TOS code was modified by Zebra Systems to cooperate with Timex Sinclair 2068 computers.] An appropriately modified jump table will enable, despite these changes, the correct operation of our programs.
The appearance of a new interface design is unlikely, but it is a programmer’s good practice to use this type of structure.
The main procedures of the system
The list of routines included in the jump table, their real addresses, names, tasks, and the method of invoking are presented in table 3. The main part of the entire system consists of the first three subroutines putdat, putcom, and getblock. Their importance is so great, and the amount of information so wide, that the entire third part of this series will be devoted to them. They all use them higher-level functions like wrtmem, rdblock, know, and even savep and loadp. The diagram of data transfer between these sub-programs is presented in Fig. 3.
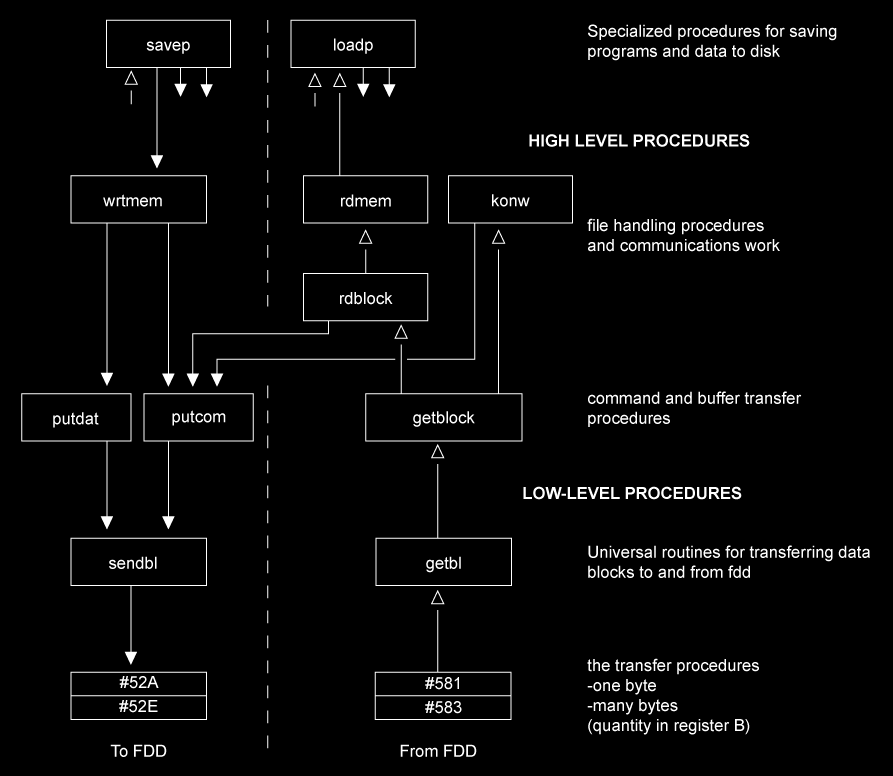
Fig. 3. Graph of data flow between the TOS system routines of the interface in communication with the disk drive. The line connecting the two rectangles in the graph means that when contacting the station the given higher-level procedure uses the appropriate lower-level procedure. The arrows indicate the direction of data transfer: to or from the disk drive. Savep and loadp routines use many lower-level procedures, but in order not to complicate the drawing unnecessarily, it was only indicated by short arrows. As you can see the putdat, putcom, and getblock are most frequently invoked and are sort of the axis of the entire system.
TABLE 3. Procedures in the jump table (# 0605- # 0628)
| address | name | description |
#0605 | putdat | Data transfer to disk drive. IN: data in buffer (# 2000- # 20FF) A – number of bytes to be sent. |
#0608 | putcom | Send a command to the floppy drive. IN: (mod) – command number; AF, BC, DE, HL, IX, IY – input data required for a given command |
| #060B #03AC | Receive a command or a buffer from the floppy disk drive. | |
| #060E #0495 | Send a block of data to the floppy drive. IN: HL – block start address; (type), (len) – type and length of this block. OUT: Z – OK, NZ – sending error; stored values of registers BC, DE and HL | |
| #0611 #04D6 | Receive data block from floppy disk drive. EC: irrelevant. OUT: Z – OK, NZ – sending error; data in buffer (when data), or at address # 2100 (when command); (type), (len) – type and length of the block sent; stored values the BC, DE and HL registers | |
| #0614 #0D94 | Reading a record from a file into the interface buffer (256 bytes at most). IN: (chan) – channel number, DE – number of bytes to be loaded. OUT: Z – OK, NZ-error; A – error code, HL – data address, BC – number of bytes loaded, DE – stored | |
| #0617 #0DBF | rdmem | Load data from a file into memory. The file must be open. IN: (prolen) – number of bytes to be loaded, (prostr) – data destination address, (chan) – used channel number. OUT: Z – OK, NZ-error; A – error code; stored values of registers BC, DE and HL |
| #061A #0BS4 | wrtmem | Saving data from memory to a file. The file must be open. IN: (prolon) – number of bytes to be sent, (prostr) – data address, (chan) – number of the channel used. OUT: Z – OK, NZ – error; A – error code; stored values of registers BC, DE and HL |
| #061D #031D | cbas | Calling a subroutine from a ZX Spectrum ROM. IN: address of the procedure to be called, needed values in registers. Directions for use: CALL cbas DEFW zx_add; routine address |
| #0620 #0A61 | savep | Save program or data to disk. IN: name in buffer (terminated with CHR $ (0)); A ‘- name length plus one; A – block type (0 – BASIC; 1, 2 – DATA; 3 – CODE); BC – length; DE – start address; HL – number start line if it is a program. When HL = 0, the program does not start. OUT: (# 2102) – error code, 0 – OK; stored values of HL, DE, BC and AF. |
| #0623 #0CC1 | loadp | Reading program or data from disk. IN: name in buffer (terminated with CHR $ (0)); B – name length plus one; (filetype) – type of the read file; (filelen) – its length, (start) – destination address. OUT: Z – 0K, NZ – error; A – error code. |
| #0626 #0688 | conv | Communication work mode. In this mode, the floppy drive controls the printing of messages on the screen, such as printing a floppy disk directory. It invokes after the prior sending a command to the floppy drive. |
| Other useful routines included in the interface ROM | ||
| #0015 | Keyboard test. IN: A – code of a pressed key (always a capital letter) | |
| #0033 | Printout of the character with the code given in the A register. Same as RST 16 | |
| #03D8 | pr_err | Print a string of characters on the screen. The “S” channel is used and the question “scroll?” Is disabled. IN: HL – text address; B – text length, if H even; H odd, 33 characters are printed. Regardless of the contents of the B register, the procedure ends the printout after when CHR $ (0) is encountered. |
| #0603 | Enable the standard ZX Spectrum ROM with enable INT masked interrupts | |
| #0604 | Same, but without interrupts | |
| #066D | Transfer text to buffer and terminate with CHR $ (0) end tag. IN: DE – text address (usually the file name}, BC – its length. OUT: A, B – length of the name with a tag, HL – address of the next character after the tag, DE – address of the next byte after the text |
Disk procedures
The easiest to use and perhaps the most useful disk handling routines are savep and loadp. They are the exact equivalents of the SAVE and LOAD instructions known from BASIC.
The required input data is described in the appropriate columns of table 1. The most important parameter is the file name: it should be in the interface buffer (address # 2000) and be terminated with CHR $ (0). This tag is important as it determines the length of the file name. The register A ‘should contain the length of the name including a trailing zero, but that is just what part of the buffer must be sent to the floppy disk. This value can be successfully larger – the part of the buffer that does not contain any will be transferred together with the name useful information. The most common use for the savep procedure is to write a CODE block to a floppy disk. Here is an example routine that executes the sequence SAVE *”data.cod” CODE 50000,100:
PRZKD1 LD DE, NAME ; file name address
LD BC, KON-NAME ; its length
CALL # 066D ; transfer name to buffer
EX AF, AF’ ; name length +1 to A’
LD A, 3 ; block type; CODE
LD DE, 50000 ; block address
LD BC, 100 ; its length.
CALL SAVEP ; save to floppy disk
RET
NAME DEFM “DATA.COD” ; file name
KON ; label needed to calculate name length
The easiest way to put the name in the buffer is by the use of a ready-made subroutine from the interface ROM at address # 066D. The description of its operation is presented in table 2. If a file with the same name as the one being saved is encountered on the floppy disk, the savep procedure tests the contents of the TOS system variable with the address # 2134. If it contains zero, the user is asked for permission to save the new file in place of the old one. Otherwise, it will be done without asking.
Both when writing and reading data from a floppy disk, four types of blocks are distinguished (exactly as in the case of a tape), marked with consecutive numbers:
0 – BASIC program,
1 – number array,
2 – character array,
3 – CODE block.
The block type is important not only as an input to the described procedure but it is also reflected in the record on a floppy disk, which will be described in more detail in one of the further parts of the article. While writing the program in BASIC from the assembler level is a bit pointless (in addition, you have to download and calculate the contents of the THRESHOLD and E_LINE), the reverse is sometimes useful and can be done with loadp:
PRZKD2 LD DE, NAME
LD BC, CON-NAME
CALL # 066D ; name to the buffer
LD HL, FILETYP
LD A, 0
LD (FILETYP), A ; block type – BASIC
CALL LOADP ; recording to memory
LD HL, # 210D ; error message address
CALL NZ, PR_ERR ; if error – message
NAME DEFM “PROGRAM.BAS” ; name of the file (program)
KON
The loadp procedure will take care of setting the appropriate system variables, so much so that the self-starting program will start itself after returning to BASIC. If the variable system TOS with the address # 2138 will have a value other than zero, then the program recorded in the above way will be attached to the existing one in memory, in the same way as it does BASIC MERGE instruction. Note: the developers of the system have completely forgotten about the RAMTOP system variable, as a result of which longer programs load smoothly beyond the intended area and destroy the stack if it is set too low – with an unpredictable result. This is one of the major shortcomings of the TOS. You can also record blocks of code with the loadp routine. Here is the subroutine that reads the file created in Example 1.
PRZKD3 LD DE, NAME
LD BC, CON-NAME
CALL # 066D ; name to the buffer
LD HL, FILETYPE ; see table 3
LD (HL), 3 ; block type, CODE
LD HL, 100 ; its length
LD (FILELEN), HL
LD HL, 50000 ; block destination address
LD (START), HL
CALL LOADP ; block record
LD HL, # 2100 ; continue as before
CALL NZ, PR_ERR
RET
NAME DEFM “DATA.COD”
KON
By resigning from the use of the jump table, the above subroutine can be shortened a bit. The fact that loadp refers to the input data (i.e. the FILETYP system variables, FILELEN and START – see Table 1) using the IX index register, having first set it to the address of the FILETYP variable. So we can put any other address in IX (where they will be provided the information you need) and jump into the procedure in the right place. Previous example after modification:
PRZKD4 LD DE, NAME ; file name address
LD BC, KON-NAME ; its length
CALL # 066D ; name to the buffer,
LD IX, DATA ; in IX, the address of the block description
CALL # 0CC5 ; block recording,
OR A ; was there a mistake?
LD HL, # 210D ; error message address
CALL NZ, PR_ERR ; if error – message
RET
DATA DEFB 3 ; block type, CODE,
DEFW 100,50000 ; block length and address,
NAME DEFM “DATA.COD” ; file name
KON
If the given block length is smaller than the real one, only as many bytes as we wish will be loaded into the memory. Wanting to load the entire file without knowing its sizes, you just need to set the largest possible length, which is 0 (equivalent to 65536 in this case). An address equal to 0 causes the block to be loaded to the place it was written from. Even from BASIC, as few people know, the LOAD *” data.cod” CODE 0,50 instruction will load half of our duty block to the address 50000, that is where it was sent from. If so we want to execute LOAD *” data.cod” CODE, in the above subroutine, change the address value and the length itself to zero. Indeed, Table 1 shows that the set zero markers is the correct execution of the loadp procedure, but there is an exception to this rule – an error of the recorded file type. Therefore, it is safer to additionally check with the OR A command whether there is a zero in the A register, which means no error.
Note: to all those who have skipped the first part of the article, and have impatiently tried to run one of the above examples, I would like to inform you that the computer “reset” itself, because it is necessary to first activate the interface memory. Any of the following subroutines can be called as follows:
FILETYP EQU # 214D ; see table 1
FILELEN EQU # 214E
START EQU # 2150
SAVEP EQU # 0620 ; see table 2
LOADP EQU # 0623
PR_ERR EQU # 03D8
ORG 60000
ENT 60000
CALL DR_ON ; activate the interface
CALL PRZKD1 ; calling the example
JP # 0603 ; enable standard ROM and return
DR_ON PUSH IY ; see pt. 1
LD IY, 0
RST 8
POP IY
RET
PRZKD1 ; here is one of the examples given
Finally, a small boot loader to analyze for yourself. It records two blocks of code and a BASIC program:
PRZKD5 LD DE, TABLE
LOOP LD A, (DE)
CP 255
RET Z
LD (FILETYPE), A
LD HL, 0
LD (FILELEN), HL
LD (START), HL
INC DE
LD BC, 12
CALL # 066D
PUSH DE
CALL LOADP
LD HL, # 210D
OR A
CALL NZ, PR_ERR
POP DE
JR LOOP
TABLE DEFB 3
DEFM “NAME1 .COD” ; 12 bytes !!
DEFB 3
DEFM “NAME2 .COD” ; 12 bytes !!
DEFB 0
DEFM “NAME .BAS” ; 12 bytes !!
DEFB 255
The third part of the article, including a fairly large table with a description of the TOS system commands, a detailed description of how to use them, and almost everything about the interface communication with the FDD station. After reading it, you will be able to call from machine code all TOS instructions available in BASIC, and even a little more.
TOS from the inside part. 3
Computer communication – FDD
In the TOS system, the computer and the interface from the master unit. It gives commands which are then carried out by the station. Communication is based on the “question – response “or” command – (execution) – confirmation. “You must remember that regardless of the task station ordered, the computer should wait for confirmation of its execution. The master unit communicates with the station via the command system, and the data is transferred via the buffer. There is a data buffer, analogous to the one existing in the interface and also in the disk drive. When a command that requires input data (such as a file name) is executed, it must be in the station buffer. If you’ve read the second part of this article, then you know how to move them there: put the name in the interface buffer and pass it through putcom. The next step is to send the command. After its execution, the disk drive sends data back to the buffer, but only when it’s needed. Finally, a command is sent from the station (called the return command) containing a series of information, including the correct execution of the command. A better understanding of the above-described computer and FDD communication mechanism will be enabled by the algorithm shown below (the conversion mode presented in it – a little further).
The list of system commands and their input and output parameters is presented in Table 4. Thanks to it, you can easily implement any TOS command using the following scheme:
- Enter the command number in the first column of the table into the system variable mod.
- If a given command requires sending some data, we put it in the buffer and send it with the putdat procedure. We are reminded of this by the word “yes” in the third column table.
- Before sending the command, appropriate input data, specified in the fourth column, should be placed in the registers.
- We send the CALL PUTCOM command. We get the return command CALL GETBLOCK or CALL KONW. The fifth column of the table tells you where to apply the communications work and when to apply it expect data to be sent to the buffer.
- If everything is correct, the return data given in the sixth column can be found in the registers or in the buffer.
Examples
The simplest communication session consists of sending a command (putcom) and then receiving a return command (get-block). This is how CLOSE # * or DRAW * is executed, for example:
DRAW LD A, 9 ; command number
LD (MOD), A ; put in the variable MOD
CALL PUTCOM ; send command
CALL GETBLOCK ; receive a return command
RET
The MOD label is # 2100 – see the description of the interface system variables in the first part of the article.
When we need to send additional data, we put it in the buffer and send (putdat) before the command. Examples of such commands are OPEN # *, GOTO *, or save data on the disk. Here is the GOTO *:
GOTO LD DE, NAME ; address of the subdirectory name
LD BC, LENNAME ; name length
CALL # 066D ; transfer to buffer
CALL PUTDAT ; send buffer to FDD
LD A, 7 ; GOTO * command number
LD (MOD), A ;
XOR A ; A = 0 – name is a subdirectory
CALL PUTCOM ; send command
CALL GETBLOCK ; receive a return command
RET ; return from subroutine
NAME DEFM “directory” ; name of the subdirectory
KON ; it’s just a label
This subroutine can also be used to change the drive: you only need to replace the command XOR A with LD A, 1 (see table 4) and replace the name of the subdirectory with the name drive.
After executing commands such as reading a sector, or file, or retrieving a list of open channel information, the station transmits the required data before sending the return command. Pickup of both the contents of the buffer and the return command is done using the get-block procedure. Here is an example program that reads Sector zero from Track 4 of the floppy disk:
SECTOR LD A, 27 ; command number
LD (MOD), A ; in the MOD variable
LD C, 0 ; drive A
LD D, 4 ; track number
LD E, 0 ; sector number
CALL PUTCOM ; send command
TWO CALL GETBLOCK ; get buffer
JR NC, TWO ; and return command
RET
Pay attention to the JR NC, TWO loop which ensures that the buffer and the return command are received successively (if you don’t know how – see table 4, description of the getblock procedure). This design is a basic advantage: regardless of whether the buffer is sent or not (and it will not be sent if there is an error in reading the floppy disk), the entire routine will be executed correctly. Moreover, it works correctly when executing simple DRAW * commands, which makes it easier to write a universal communication procedure. If we want to execute a command that requires two names (ie LET, MOVE, or FORMAT), the sent buffer should contain them. Put them in the order they appear in the syntax BASIC, separating and ending with CHRS (0).
Communicationsl work
The conversational work consists of the fact that the station sends a series of messages to be printed (not about error messages) or waits for a key to be pressed. They are performed in this way, statements such as CAT *, LIST *, and FORMAT *. Thanks to the existence of a special know procedure, the operation of the conversational mode is very simple. The following subroutine executes the same as the CAT * command called from BASIC:
CAT LD A, 11 ; as before
LD (MOD), A ;
CALL PUTCOM ; send command
CALL KONW ; calling the conversation work procedure
RET ; and back
Such a structure is sufficient in most applications, but sometimes it is necessary to know how to organize conversational work. In short, the return command includes in the mod variable your code. It is one of the four possible numbers from 128 to 131, the meaning of which is described in Table 5. In the case of the simple commands described above, it is always code 128 indicating that the station has carried out the command (not necessarily correctly). When the number contained in the variable mod is greater, it means a request to execute one of the ones described in Table 5 activities. After their implementation (or not), send a confirmation command (at this point it is worth looking at the algorithm again) with a special code 145 and you can receive the buffer again and return the command. And so until it is successful, that is, the station sends the code 128. As an example, it is worth analyzing the subroutine setting of the transmission parameters of the B channel of the serial interface.
FORMAT LD DE, CH_TXT ; channel name address
LD BC, 5 ; its length
CALL # 066D ; put into buffer
CALL PUTDAT ; send to station
LD A, 21 ; FORMAT command code *
LD (MOD), A ;
LD HL, DATA ; addr of TI formatting parameters description
CONVERTER PUSH HL ; storage on the stack
CALL PUTCOM ; send command
TWO CALL GETBLOCK ; get buffer
JR NC, TWO ; and return command
POP HL ; data address recovery,
LD A, (MOD) ;
CP 128 ; end of conversation work?
RET Z ;
LD A, 145 ; confirmation code
LD (MOD), A ;
LD A, (HL) ; get parameter
INC HL ; showing the data address
JR CONVERTER ; revision
;
CH_TXT DEFM “: CH_B” ; channel name
DEFB DATA 0, “B”; Text or bytes? B
DEFB 0, “N” ; XON / XOFF? N
DEFB 0, “Y” ; Input with wait? Y
DEFB 0, “O” ; Baud rate? ABOUT
DEFB 0, “N” ; parity? N
DEFB 0, “A” ; Stop bits? AND
DEFB 0, “D” ; Bit / char? D
During conversational work, the disk drive can wait a long time for confirmation and there is no time limit. The conversational work loop visible in the algorithm can also be found in Cancel at any time, i.e. give up, for example, the end of the floppy disk directory being sent. For this, it is sufficient to enter any command code from table 4 in place of the confirmation code 145. The Station will interpret this as wanting to abandon the execution of the previous TOS instruction and start executing the new one. It should also be added that the CONVERTER procedure is written in such a way that it can be used in place of the getblock procedure. In place of the sequence:
TWO CALL GETBLOCK
JR NC,TWO
you can successfully write CALL CONVERTER
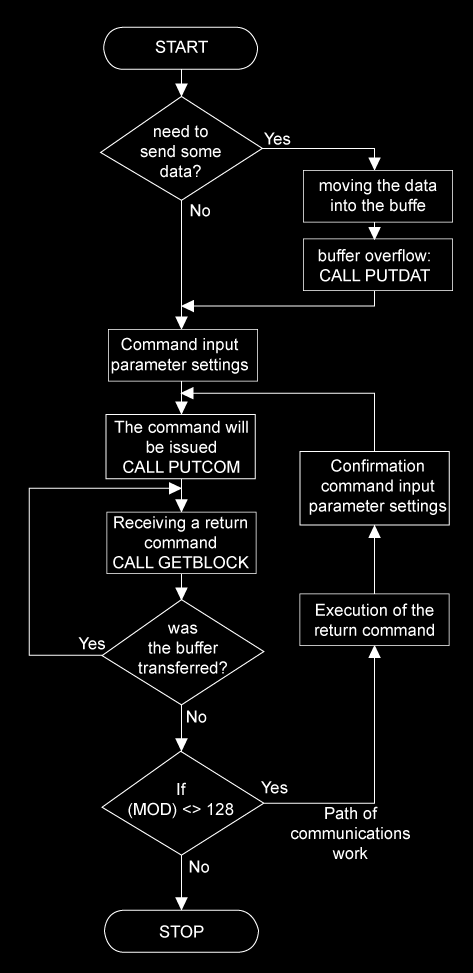
Fig. 4. The algorithm shows a diagram of the structure of a subroutine that executes one of the TOS instructions given in Table 4.
Error handling
The command is sent by sending 13 bytes starting with the address # 2100. There is its number and the values of all registers in sequence. The command is structured in the same way return. However, in the event of an error, which is 32 bytes long, the station additionally sends a message about the irregularities encountered. Register A, which in the case of correct execution of the command is 0, now contains the error code (in the case of calling the CONVERTER procedure, the contents of register A are destroyed and the error code is only found under address # 2102). Here is a universal routine that prints the error message on the screen when it occurs:
ERROR LD A, (12102) ; error code
OR A ; O.K.?
RET Z ; return if no error
LD HL, # 21OD ; address of the sent message
CALL PR_ERR ; its printout
RET
It can be called each time after the station executes the command, i.e. both after downloading the return command and after executing the conv.
Traditionally, it’s better to activate the interface ROM, before trying to run the given sample programs. How it’s done, you can read in the previous parts of the article.
TABLE 4. Return commands
| code | command | output | code | input |
| 128 | End of command execution | Described in table 5. | ||
| 129 | Requesting a message to be printed | The message text is in the buffer (address #2000) and it is terminated with chr (0) | 145 | none Code 145 Is a confirmation of the will to continue execute the command |
| 130 | Request to print the message and wait for pressing ENTER | 145 | A = 13 – ENTER key code | |
| 131 | Request to print the message and wait for pressing a key | 145 | A – code of the pressed key |
TABLE 5. Description of system commands
| code | command | buf | input data | received | return data |
|---|---|---|---|---|---|
| 0 | Opening channel OPEN # * no .; … | yes | A – channel number (1-16): 1-4 fast channels 5-16 channels free D – channel operating mode: D = 0 – append D = 1 – input D = 2 – output D = 3 – random E – data access mode: E = 0 – record-breaking, in IX length of the record E = 1 – random access | norm | (# 2102) or A – error code. A = 0 – OK, A> 0 – error message at the address (# 210D- # 212C) |
| 1 | CLOSE#*nr | no | A – channel number | norm | |
| 2 | Creation file or directory: DIM * “name” | yes | A = 0 name means a file or subdirectory, A = 1 file only (used with SAVE). | norm | |
| 3 | Stack printout subdirectories LIST* | no | lack | comm | (# 2102) – error code (# 2104) or B – the number of items in the stack subroutines (1-8) (# 2107) or L – the number of the current drive. (# 2108) or H – number of the current subdirectory |
| 4 | Deleting the file or catalog: ERASE * “name” | yes | A = 0 – question if you really want to delete. A = 1 – removes without asking | comm | (# 2102) – error code. If there is a mistake, at the address (# 210D- # 212C) error message |
| 5 | Name change LET * “n1” TO “n2” | yes | Before sending the buffer, there should be the old and the new one in sequence name, separated and followed by CHRS (0). | norm | (# 2102) or A – error code. A = 0 – OK, A> 0 – a message at the address (# 210D- # 212C) error. |
| 6 | MOVE*”nl” TO “n2” | yes | norm | ||
| 7 | Change sub-directory or drive: GOTO * “name” | yes | A – information about the given name: A = 0 – subdirectory, A = 1 – drive names | ||
| 8 | A printout of the current subdirectory. | no | lack | comm | (# 2102) – error code. (# 2107) or L – the number of the current drive. (# 2108) or H – number of the current subdirectory |
| 9 | DRAW* | no | lack | norm | As for command no. 0 |
| 10 | Pushes the current subdirectory onto the stack. | no | NOTE: This command is not equivalent to GOSUB *. It’s necessary to still execute command number 7 (GOTO *). | norm | |
| 11 | CAT* | no | lack | comm | As for command no. 4 |
| 12 | CAT*”name” | yes | lack | comm | |
| 13 | LIST*#nr | no | B – channel number. | comm | |
| 14 | LIST”* | no | lack | comm | |
| 15 | Save to file | yes | B – channel number In record mode: DE – record number (1-65536) DE = 0 and C = 0 – next. In random access: DE – number of bytes to write (1-256). | norm | (# 2102) or A – error code. A = 0 – OK, A> 0 – error message at the address (# 210D- # 212C) |
| 16 | Reading from a file | no | As above, and with random access: DE = 0 and C = 255 successive text words are read from the file | buff. | (# 2102) or A – error code. A = 0 – loaded record is in the buffer, DE – length record. A> 0 – error message at the address (# 210D- # 212C) |
| 17 | Formatting a floppy disk | yes | A = 0 – 40 tracks, A = 1 – 80 tracks. Data in buffer as for LET * (command 5) | comm | (# 2102) – error code. If the error is at (# 210D- # 212C) error message. |
| 18 | Sending information about channels | no | lack | norm | B – no. of a free channel |
| 19 | It sent information about an open channel | no | A – channel number | buff. | (# 2002) – operating mode: 0 – append 1 – input 2 – output 3 – random (# 2004) – access mode: 0 – record-breaking 1 – random access (# 2005) – channel number (# 2006-8) – file length (3 bytes!) (# 2009-A) – number of the next record (element) (# 200C) – dl. record (# 200D-F) – byte number in the file (counted from 0) |
| 20 | Securing and hiding files ATTR * “name” | yes | A = 0 – deprotection (U) A = 1 – securing (P) A = 2 – visualization (V) A = 3 – hiding (I) | norm | As for command no. 0 |
| 21 | RS232C formatting | yes | lack | comm | As for command no. 4 |
| 22 | RESTORE#nr | no | A – channel number | norm | As for command no. 0 |
| 23 | Sending the TOS version number | no | lack | For version A.2: H =% 00010001 – older 4 bits – “A” – lower 4 bits – “2” | |
| 24 | Running a subroutine in memory Timex FDD 3000 station | no | IY – address of the subroutine to be run. A, BC, DE, HL – passed to the subroutine. | Register values after subroutine execution | |
| 25 | Transfer of data block from station memory to the interface buffer. | no | A – dl. block being sent. DE – block address in station memory | buff. | (# 2102) or A – error code. A = 0 – the block sent is in the buffer. A> 0 – (# 210D- # 212C) error message. |
| 26 | It will stop the data block from the buffer interface to the station memory. | no | Due to a TOS bug, you have to manually construct the o command length such as the block being transferred. (# 2105) – destination address in the station memory. | norm | DE -address of the end of the transferred block + 1 |
| 27 | Loading a sector from a floppy disk | no | C – drive number, C = 0 A drive, 1-B etc. D – track number, E – sector number. Sequentially E = 0, 7, 14, 5, 12, 3, 10, 1, 8, 15, 6, 13, 4, 11, 2, 9. | buff. | (# 2102) or A – error code. A = 0 – the sector read is in the buffer. A> 0 – error message at the address (# 210D- # 212C) |
| 28 | Record a sector on a floppy disk | yes | norm | As for command no. 0 | |
| 29 | CLOSE* | no | lack | norm | As for command no. 0 |
| 30 | Requesting the address of a service function in the disk drive. | no | A – number of auxiliary function. | norm | HL – address of the auxiliary function |
| 31 | ? | no | |||
| 32 | ? | yes | |||
| 33 | Equivalent to GOSUB * “path” | yes | norm | As for command no. 0 |
What’s next?
In the next part of this cycle, I will show you how to use the disk drive memory and run programs in it. There are also some interesting uses for the interface, including a simple way of extending the BASIC interpreter instruction list and self-executing CODE programs. To the impatient, I inform you that all necessary to complete these ideas, information has already been provided and can be found in the tables included in this part of the article or the previous ones.
TOS from the inside part. 4
The entire fourth part of the “Tos without secrets” series is devoted to two system variables of the interface: jump and finit, which give the programmer a lot of possibilities. Reading this article will answer a series of questions about a few common software tricks that shouldn’t work at first glance on the ZX Spectrum.
In the first part of the series, I wrote that the creators of TOS left several gates for programmers. The algorithm presented there was by definition general, so it could not show how to use them.
Fig. 5 shows its new version, which includes two places where we can change the course of the disk command interface saved in the ROM.
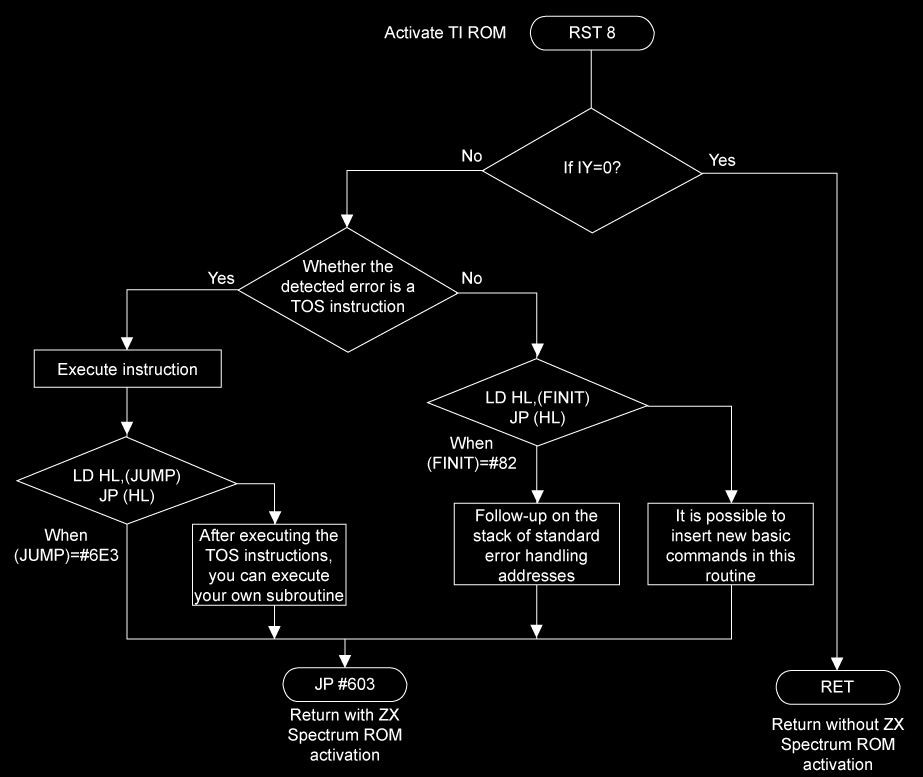
Fig. 5. Algorithm showing how the interface handles RST 8.
Among the interface system variables (see Table 1) there are two variables jump and finit, which contain the address of the BASIC return procedure after the TOS command and the address of the syntax error handler. As the algorithm shows, the handling of each TOS command ends with the sequence: LD HL, (JUMP): JP (HL), which allows us to change the content of the jump system variable, to run another (your own) program before going back, or even instead of going back to BASIC. A similar situation occurs when a syntax error is encountered: usually, the routine from address # 0082 is executed, as this is what the finit variable originally has. However, by changing the address it contains, you can execute your own program recognizing and executing new, manually defined BASIC statements.
Self-starting programs
As an example of using the jump variable, it is worth analyzing and running the following program:
10: ; Program: DONE!
20: ORG 60000
30: ENT 60000
40: JUMP EQU # 213D
50: CBAS EQU # 061D
60: BEEP EQU # 03B5
70: PR_ERR EQU # 03D8
80: ; Program installation:
90: PUSH IY ; activate interface
100: LD IY, 0
110: RST 8
120: POP IY
130: ; New address for JUMP variable:
140: LD HL, RUN
150: LD (JUMP), HL
160: JP # 0603 ; End of installation.
170: ; ————————————–
171: ; Main program writing text DONE !:
180: RUN LD HL, MESSAGE ; text address
190: CALL #PR_ERR ; write text
200: JP # 06E3 ; jump to standard return procedure
210: NAPIS DEFM WORDS “DONE!” ;text
220: DEFB 0
It consists of two parts: the installation and the main part. It needs to be compiled and then run (in the case of GENS with the R directive). This will install the program, i.e. changing the value of the variable jump to the address of the RUN label. Now go back to BASIC and check its operation: after executing each TOS command, the computer will write “DONE!”.
Although this thing is not very effective and useless, it is an important step in understanding the methods and learning the skills of programming the station. The use of this mechanism enables, in a way that can be safely called a trick, to create self-launching CODE programs.
The main thing to be aware of is that the interface is active during TOS operations, so also when writing to and reading from the floppy disk. Command SAVE * “ROM” CODE 0,16384 will not write the ZX Spectrum ROM on the floppy disk at all, but visible in this ROM and RAM address space of the interface! Similarly, reading the data to address # 2100 will result in modifying the contents of interface system variables. It is easy to predict that such action will usually result in the system freezing. However, it can be created specifically a crafted file, which, after being loaded into the # 213D address, will only change the value of the variable jump and a dozen or so others that are not recorded during recording (accidentally and after certain conditions are met!) any meaning. If, for example, we assume that 100 bytes are read, the first 24 will be in the system variable area, and the remaining 76 (containing the program to run) will be in the free RAM area of the interface. Now the variable jump contains the address of this program and thanks described at the beginning the mechanism will be started. Here is a program that, after typing and running, will create a self-booting file on the disk called “START.COD”:
.10: ; A program that creates a file on a floppy disk
.11: ; self-starting CODE type.
.20: ORG 60000
.30: ENT 60000
.40: FINIT EQU #213B
.50: JUMP EQU #213D
.60: RAM EQU #2154
.70: SAVEP EQU #0620
.80: PR_ERR EQU #03D8
.90: ; Activate the interface:
100: PUSH IY ; activate interface
110: LD IY, 0
120: RST 8
130: POP IY
140: ; Sets variable jump to the auto-start address
141: ; and transferring his program there
142: ; handling:
150: LD HL, #0082
160: LD (FINIT), HŁ
170: LD HL, RAM
180: LD (JUMP), HL
190: EX DE, HL
200: LD HL, START
210: LD BC, KON-START
220: LDIR
230: ; SAVE * “START.COD” CODE JUMP, KON-START + 24
240: LD DE, NAME
250: LD BC, END-NAME
260: CALL #66D
270: EX AF, AF ‘
280: LD A, 3
290: LD DE, JUMP
300: LD BC, KON-START + 24
310: CALL SAVEP
320: JP #603
330: NAME DEFM “START.COD”
340: END
350: ; ———————————-
351: ; Code of the self-start-up program.
360: START LD HL, #06E3 ; in the JUMP variable belongs
370: LD (JUMP), HL ; put previous address
380: LD HL, LETTERS-START+RAM ; text address
490: CALL PR_ERR ; write message
400: JP #06E3 ; return to BASIC
410 LETTERS DEFM “HERE AUTOSTART. WELCOME!”
420 DEFB 0 ; text
430 KON ; end label
Most of the instructions of the above program are only intended to install the procedure and save it to disk. The proper part is at the end of it and only this part will be found in the file. After entering the LOAD * “START.COD” CODE command from BASIC, the message “HERE AUTOSTART! WELCOME!” will appear on the screen. This is not a “DONE!” trick, which is easy to be sure of turning off the computer for a while. If you want to create self-booting files using the above method, remember that the code contained in them must be relocatable. You must also absolutely remember to set jump to the standard value (lines 360 – 370). To remove any ambiguities I will add that although the “START.COD” program will run itself after recording, it is still a CODE program and in no case will it be automatically launched when the computer is turned on, i.e. system startup, even got to name it “START”.
The use of the above method allows you to obtain completely new and unusual effects. One of the readers sent us a very nicely made program for compressing files on the disk.
The packed file contains a decompression procedure inside, which by running in the above way loads the data into the memory, unpacking it at the same time. If we receive consent author, we will include this program in the ongoing ZX-SHAREWARE.
New instructions
The subroutine that supports new BASIC instructions is conveniently placed in the interface RAM, because it is an area quite well protected against changing the contents, and even not available for the NEW command. It is not easy to write such a program and it is difficult even for moderately experienced programmers. It must consist of two parts:
parsing and executing individual commands. The former usually causes the most problems. Not only is it necessary to recognize the operating mode of the computer (parsing or executing the program), the stack is still “cluttered” with some addresses, the number of which depends on the command code. The interface ROM contains quite good and workable use mechanisms for parsing the syntax, by means of which you can, by creating a special table and a small programmer, implement a number of new commands with quite complicated syntax. The description of this method would be addressed to a narrow group of people, too long and difficult to include in Bajtek. For those interested in this problem, I can provide information by correspondence.
The simplest method of appending a new instruction is to use an unused CAT instruction. Its advantage is that its syntax is checked and accepted by the interpreter, so it doesn’t you have to take care of her. This fact simplifies the handler considerably, as can be seen in the example below. The parsing part is only lines 180 to 220. After typing it should compile it, and then run it with the R assembler directive.
10: ; Installing a new BASIC instruction.
20: ORG 60000
30: ENT 60000
40: FINIT EQU #213B
50: MOD EQU #2100
60: PUTCOM EQU #0608
70: GETBLCK EQU #060B
80: ; Installing part:
90: PUSH IY
100: LD IY, 0
110: RST 8
120: POP IY
130: ; In the variable FINIT, the new address:
140: LD HL, RUN
150: LD (FINIT), HL
160: JP #0603 ; end of installation.
170: ; ——————————————–
171: ; New CAT instruction handler:
180: RUN LD HL, (23645); address of the command to be interpreted,
190: DEC HL
200: LD A, (HL) ; code of this command
210: CP 207 ; is it CAT?
220: JP NZ, #0082 ; if not – return
230: POP HL ; “clean” the stack
240: LD A, 11 ; CAT command code *
250: LD (MOD), A
260: PETLA0 CALL PUTCOM ; send command.
270: ; Support for conversational mode:
280: PETLA1 CALL GETBLCK ; receive buffer
290: JR NC, PETLA1 ; and callback
300: LD A, (MOD) ; callback code
310: CP #80 ; end?
320: JP Z, #0603 ; yes – return
330: XOR A ; shortened text to
340: LD (#2014), A ; 14 characters
350: CALL #06D5 ; write text from buffer
360: LD A, #91 ; continuation code
370: LD (MOD), A
380: JR PETLA0 ; close loop
The installer places an address equal to the value of the RUN label in the finit variable. Back in BASIC, you can type CAT and instead of the usual “lnvalid stream” you will see the floppy directory. To distinguish it from the traditional one, it is a bit modified. The above program is located at 60000, which proves that it can be anywhere in the memory. However, when you put it in the interface memory, you can then save on a floppy disk (as one block) a fragment of memory from address # 213B (address of the finit variable) until the end of the program. To reinstall this new manual, just upload the resulting file to your computer. The same principle works in Bytie 2/92 program EXX.COD. The curious can use his example to see how to easily write a syntax analysis for three new, completely unusual commands.
The disk
For starters – a handful of information on how to save data on a floppy disk. The standard drive has two sides, called A and B. On a 3-inch floppy disk, the appropriate letters are displayed and the change of the side consists in taking the disc out of the drive and inserting it oppositely. In 5.25 “drives with two heads, the matter is as simple – just use a switch, which the station should be equipped with. With 80-track drives, you don’t need to switch anything as the TOS can format to 640K using both sides.
The surface of each side of the floppy disk is divided into tracks, which are 40 or 80 depending on the type of drive. There are sixteen sectors in each of them.
It is easy to calculate that the track contains 4 kB and the sector is 256 B. Sectors are grouped by fours in the so-called allocation units, numbered from zero. There are four of them on each path. In 640 kB format, the allocation unit contains 4 kB, which is exactly the entire track. From a simple calculation, we get the capacity of an ordinary floppy disk: 2 sides * 40 tracks * 4 kB = 2 * 160 kB = 320 kB, and dense: 2 sides * 80 tracks * 4 kB = 640 kB. All tracks and sectors are zero-based.
Tracks 0 to 3 contain the operating system (16 KB) that is automatically loaded into the station’s memory after it is turned on or reset. On track 4 there is a directory on the disk it is the most interesting from a programmer’s point of view. This area is divided into 128 fields (records), 32 bytes each. Each field describes the entire file or sometimes only part of it. Meaning individual bytes is explained in figure 6a. Since a single directory record describes a maximum of 16 allocation units, for files longer than 16 KB (or 64 KB in the format (dense), more than one such record is created. The directory is contained in allocation units with numbers from 0 to 3 (in dense format – only 0). The directory structure imposes a maximum of 127 files that can be on a floppy disk.
If we create a subdirectory on the disk, information about it will also be placed in the disk directory. The description of the subdirectory record is shown on the fig. 6b. At the beginning of the directory track there is always a disk name, written in the same way as a subdirectory record.
Figure 7 shows the numbering of sectors and allocation blocks. The allocation block is the basic accounting area of floppy disk memory. Its length defines the smallest space that the file may take up. If you write 100 bytes on a regular drive, a 1KB area will be reserved for them anyway. In a dense drive where the allocation unit has 4 kB, the resulting waste is even greater. On a rare floppy disk, each side is numbered separately. The dense drive numbers both sides of the floppy disk alternately. Feeding an allocation block is always at the beginning of a directory track. There is no information in the directory about the types of files on the floppy disk. The TOS system, as in the case of recording on the tape, distinguishes between four types. Whether it is a program or a drawing is decided by the header placed at the beginning of the file. Figure 3 shows its structure in all four cases. So it is obvious that the picture is saved on a floppy disk it is not 6912 but 6917 bytes.
[The method of organizing a floppy disk is basically the same as in the CP/M 2.2 system. Sparse disks can be read without any problems under CP / M, after appropriate configuration parameters and interleaving. The files in the TOS subdirectories will appear in the USER CP/M areas (only 15 subdirectories can be created under TOS). Saving files under CP/M is also possible, but the exact length of the file (in the range of the last 256 bytes), which was solved differently in TOS and CP/M, will be incorrectly written. At least, using a rare broker floppy disks, we transferred a large number of files from TOS to 820 kB disks, from which you can read programs using a simplified version of TOS – the TOSQ1.COM program under CP/M. ]
0 | 1-8 | 9-B | C | D | E | F | 10-1F |
|---|---|---|---|---|---|---|---|
K | N | E | O | L | R | R | A |
K – number of the subdirectory in which the file is;
N – 8 bytes of name (capital letters);
E – 3 bytes of extension; additionally:
bit 7 E1 – hidden file
bit 7 E2 – file protected against deletion;
O – number of the next record when describing a long file;
L – number of bytes in the last sector of the file;
R – number of 128-byte records used by the file;
A – 16 bytes describing the unit assignment allocative.
Fig. 6a. File record
0 | 1-8 | 9AB | C | D | E | F | 10-1F |
|---|---|---|---|---|---|---|---|
K | N | E | 00 | 00 | 00 | D | 00 |
K – number of the subdirectory in which this subdirectory is (FF for the disk name);
N – 8 bytes of name (capital letters);
E – 3 extension bytes (DIR); additionally:
bit 7 El – hidden directory
bit 7 E2 – directory protected against deletion;
D – byte specifying the number assigned to the subdirectory (0 for the disk name).
Fig. 6b. Subdirectories record
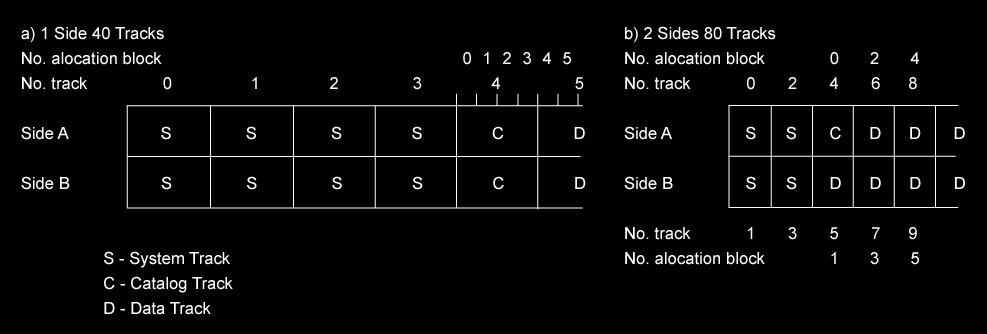
Fig. 7. Track numbering for a) plain disk (320 kB), b) dense disk (640 kB).
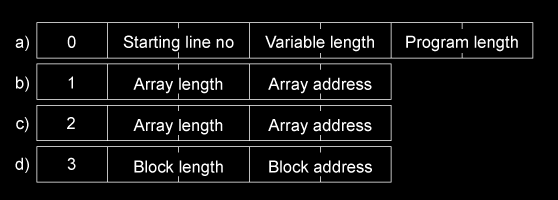
Fig. 8. Structure of file headers: a) BASIC language program, b) numeric array, c) character array, d) CODE type.
Station memory
In the list of system commands (Table 5), there are three commands (with codes 24, 25, and 26) that help operate the memory of the Timex FDD 3000 station.
One runs the program in the disk drive, and the next two are responsible for transferring data between it and the computer. Unfortunately, broadcasting to station memory does not work due to an error made by TOS developers. There was a hint in the table on how to deal with this, but too crude to be easily used. However, we are glad that we did not take previously this topic because yesterday there was a completely new idea to work around this error.
The new method is more effective and two times faster than the one used so far. In short, it looks like this: the data block should be transferred to the station buffer with putdat routines, and then run a subroutine:
LDIR
RET
found by luck in the memory of the station at #1879. It enables the transfer of data from the station’s buffer to any place in its memory. In the frame shown here, three fully relocatable routines will make it easier for you to access these 48 hidden kilobytes. The use of subroutines is obvious, and the usage is shown in the following simple example:
; Sample program showing how to use
; ZX_FDD and FDD_ZX procedures.
ORG 60000
; Saving the screen in the memory of the disk drive.
ISAVE CALL DR_ON
LD HL, 16384
LD DE, 20000
LD BC, 6912
CALL ZX_FDD
JP #0603
; Restore the screen content.
PLAY CALL DR_ON
LD HL, 20000
LD DE, 16384
LD BC, 6912
CALL FDD_ZX
JP #0603
DR_ON PUSH IY
LD IY, 0
RST 8
POP IY
RET
; Place the procedures FDD_ZX and ZX_FDD here.
PUTCOM EQU # 0608
CONV EQU # 0688
MOD EQU # 2100
PUTDAT EQU # 0605
GETBLCK EQU # 060B
BUFDAT EQU # 2000
FDDBUF EQU # 3E22
; FDD3000 -> ZX SPECTRUM
; IN: AS IN LDIR
FDD_ZX LD A, B
OR C
RET Z
PUSH HL
PUSH BC
PUSH DE
EX DE, HL
LD A, # 19
LD (MOD), A
XOR A
CALL PUTCOM
Pl CALL GETBLCK
JR NZ,P1
POP DE
POP HL
LD BC,256
XOR A
SBC HL,BC
JR NC,P2
INC H
LD B,H
LD C,L
LD L,0
P2 PUSH HL
LD HL,BUFDAT
LDIR
POP BC
POP HL
INC H
JR FDD_ZX
; SPECTRUM –> FDD3000
; IN: AS IN LDIR
ZX_FDD LD A,B
OR C
RET Z
PUSH HL
LD H,B
LD L,C
LD BC,256
XOR A
SBC HL,BC
JR NC,P3
INC H
LD B,H
LD C,L
LD HL,0
P3 EX (SP),HL
PUSH DE
PUSH BC
LD DE,BUFDAT
LDIR
PUSH HL
CALL PUTDAT
POP HL
POP BC
POP DE
PUSH HL
LD HL,FDDBUF
PUSH IY
LD IY,#1879
LD A,24
LD (#2100),A
CALL PUTCOM
POP IY
INC D
POP HL
POP BC
JR ZX_FDD
; RUN THE PROGRAM ON THE DISC STATION
; IN: IY-START ADDRESS
RUNFDD LD A,24
LD (#2100),A
CALL PUTCOM
CALL KONW
RET
After compiling, two programs are created in memory: USR 60000 remembers the appearance of the computer screen in the disk drive memory, and USR 60018 restores it. For a RAM disk, this is too free, but already suitable for presenting drawings.
And this is it!
The five-part series of articles, which is just ending, contains practically all the knowledge of a programmer who wants to use TOS from the level of machine code.
He can write his loader in machine language, and also make the game a version that works with disk. Everything is a matter of practice and experience. You can (what a trivial idea)
use the station as an intelligent buffer for the printer. Or have core wars. There is nothing to prevent you from writing a program that turns your station into a software coprocessor
math to Spectrum. It is worth knowing how to program and it is a great adventure. Try and you, not just games, games, and games …
The original text appeared in Bajtek magazine. It was scanned in November 2001 and was waiting for better times as it was. Converting to text (HTML) has been done made in April 2010. All episodes were put in one HTML file. Comments have been added. For greater clarity, the numbering of tables and figures has been changed.
The content of the programs has been checked, and all hexadecimal addresses are written with four digits (except for pictures). Since I received several requests to translate to English, there will probably also be an English version, after the editing work is completed.
I publish the text in good faith, for archiving and education purposes, without the consent, knowledge, and knowledge of the will of the authors and the publisher Bajtek.
ZXVGS reference (by Jarek Adamski)
Files created with TOS A.2 can also be used with ZXVGS. The minimum compatibility of the BASIC syntax (in the form of LOAD * and SAVE * support) is in the BZX.RZX extension – if the programs do not use other BASIC statements, the program name should end with BZX. The BA2.RZX extension is supposed to support the broader syntax, but it will not operate low-level disk drives (with interface activation). The CZX extension is recommended for CODE files, and DZX for tables.
When copying TOS files to another system to use them under ZXVGS (also TOSQ1.COM under CP / M), pay attention to converting file headers from 5 and 7 bytes to 9 bytes.