
TIMEX BASIC 64
User Manual for TC2048
Graphic pack Basic 64 TC2048
Graphic pack Basic 64
Extension to Sinclair Basic
Version for TC2048
Graphic Pack Basic 64
Note: The Basic64 routines can be used in the user programs.
Commercial programs must refer that the Basic64 routines are used.
CAP 0 – Introduction
The Basic 64 program gives the possibility to the user, to use the extended graphic capabilities and special text printing, supported by the design of the TC2068 (in ZX Spectrum mode) and TC2048 microcomputers.
Two special channels are used, to print in 64 columns (channel #4) or print in a variable number of columns (channel #5). There is implemented a new group of Basic commands in addition to the existing ones, allowing the use of those graphics modes in Basic programs. Is possible too, the use of machine code routines to use those capabilities.
CAP 1 – System initialization
Put the Basic64 tape in the tape recorder and type:
LOAD “”
After the LOADER stop to LOAD, this message appears on the screen:
TEM O SISTEMA FDD LIGADO AO COMPUTADOR? (S/N)
(Do you have the FDD system connected to the computer (Y/N))
If the answer is no, so the BASESTA code block is loaded. If the answer is yes, the BASEST code block is loaded, what justifies this is that with the FDD connected, the machine code routine is a little different. Then the second code block is loaded, then a message appears on the screen:
0 OK, 0:2
Now you can verify that a line 0 exists and include a direct call to the routine and a copyright message. The call to the routine, will relocate BASIC, start the new system variables introduced by Basic64, open the new channels (#4 and #5), and prepare the Basic interpretor, so it accepts the syntax of the new commands.
The user must execute a RANDOMIZE USR 31488, after a CLEAN n, RUN n or a GOSUB n to access the extended commands. You are advised to edit the Basic programs in 32 columns mode, so execute the following command:
OUT 255,0
After editing, you can return to extended mode with the INK *n or PAPER *n.
1.1 SAVE and LOAD Basic64 programs
There are two ways of saving programs in Basic64, one of them involving, the change of the basic program in the tape.
In the first step, common to both processes, the program is saved in the tape by the usual way. To call it, you can LOAD the Basic64 routine and then LOAD the program. If you want to LOAD all in a single step (using just one LOAD””), you must perform the following way: first, make a NEW and then from the Basic64 tape execute MERGE””, after that, you make a LIST and see that line 15 have a comment. Replace that line with one with a LOAD”name” to LOAD the program in Basic64 and save this LOADER with SAVE “BASIC64” LINE 10
CAP 2 -Extended Basic
2.1 Resolution modes
The user has two graphic modes permitted by the system:
0 – 256×192 pixels (256×176 pixels in the zone dedicated to printing)
1 – 512×192 pixeis (512×176 pixeis, the same)
Those modes, both using the two DISPLAY FILES, are relative to the new graphical commands, which we will introduce and will be explained in the next section:
- PLOT* x,y
- LINE x,y
- LINE x,y,z
- CIRCLE* x,y,r
- SCREEN$ n
The modes 0 and 1 can be used in the same program and are independent of the printing commands. It’s possible in any of both, to use channels #4 and/or #5 in the following way:
#4: This channel is specially dedicated to print in 64 columns. It uses the character set in the ROM, appointed by the system variable CHARS. Each character is defined in a matrix with 8×8 pixels. The printing is invoked by the commands PRINT #4… and LIST #4…
#5: This channel permits flexible printing because it is programable by the user.It has two steps of freedom.
-Number of columns in screen (system variable MAXCL)
-Number of pixels, in the horizontal, of the pixels matrix of the definition of the characters (system variable LARG).
There is a new character set defined in a 6×8 pixel matrix, pointed by the system variable CHRST. This set is used to print in 80/85 columns and can be used to print in 64 columns. So the #5 channel is defined, by default, in the following way:
-Printing the new character set in 85 columns and with a 6×8 pixels matrix, using the PRINT #5… and LIST #5… commands.
2.2 New Basic Commands
2.2.1 Text printing commands
- PRINT #n… The n parameter is the used channel (#4 or #5). The field … indicates a sequence of the PRINT command, separated by separators (, ; and “). The parameters can be numerical and string expressions and control characters (AT m,n TAB n).
- LIST #n;m The n parameter is the used channel (#4 or #5). This command lists the program starting from line m. If m is not specified, then the list will be made from the first line of the program.
2.2.2 Graphical commands
- CLS* Erases the two DISPLAY FILES.
- INK* n The user can only put a combined INK and PAPER for both DISPLAY FILES. This command puts INK=n and PAPER=7-n.
- PAPER* n Like INK*n. Puts PAPER=n, INK=7-n
- SCREEN$ n Sets the resolution mode.
- n=1, the mode 512×192 is active.
- n=0, the mode 256×192 is active.
- PLOT* x,y Puts a PLOT of INK in the pixel x,y and updates the PLOT position. OVER and INVERSE act as normal.
- LINE x,y,z Draws a line from the PLOT position, changing horizontally x and vertically y, and make an arc of a circle.
- LINE x,y LINE x,y,0
- CIRCLE* x,y,r Draw a circle with center x,y, and radius r, if the screen mode is 0. If the screen mode is 1, it draws an oval.
2.3 Memory organization
The memory map is characterized by the existence of two DISPLAY FILES and the relocation of the reserved Basic area. It is moved to address 33489 (pointed by the system variable PROG). Next to the attribute area of the second DISPLAY FILE is the Basic64 routine (address 31488), which is above the Basic area.
The new character set is in a zone between the two DISPLAY FILES, in the address 23755.
Basically, we have:
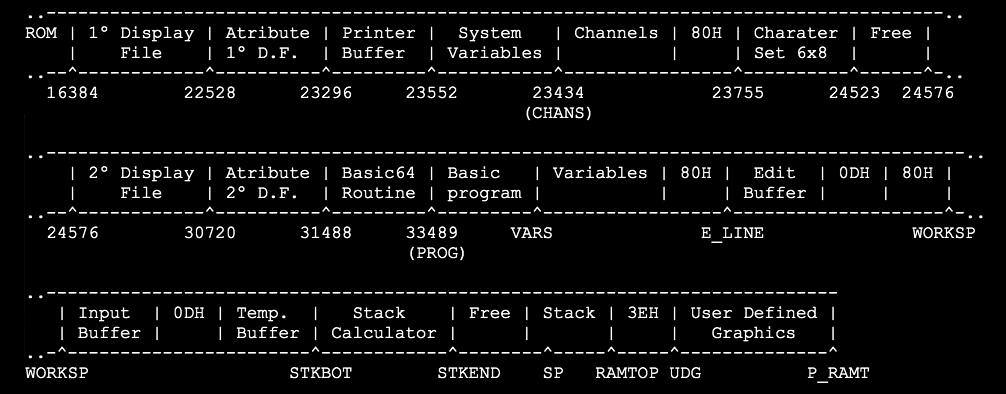
The abribute zone of the two DISPLAY FILES are not used by Basic64, so they may be used to contain machine code.
2.4 New system variables
In the adicion of the microcomputer’s system variables, the routine uses the next system variables:
| Nº of bytes | Adress | Name | Usage |
| 2 | 32283 | XCOORD | Coordinate x of the last PLOT |
| 1 | 32285 | YCOORD | Coordinate y of the lasr PLOT |
| 1 | 32286 | FLAG | System flag |
| 2 | 32287 | COUNT | Counter |
| 2 | 32289 | WORK | Buffer |
| 1 | 32291 | VDMOD | Resolution mode: 0 = 256×176, 1 = 512×176 |
| 1 | 32292 | COL | Column of the last printed character |
| 1 | 32293 | LIN | 21 minus the line of the last printed character |
| 2 | 32294 | XCR | Used by channel #5 |
| 1 | 32296 | YCR | Idem |
| 1 | 32297 | CURST | Channel that is beeing used |
| 1 | 32298 | NCOL | Maximum column number in use |
| 1 | 32299 | LARG | Pixels character wide used by channel #5 |
| 1 | 32300 | MAXCL | Maximum column number to use in cahnnel #5 |
| 1 | 32301 | CHRST | 256 minus the address of the character set used by channel #5. By default is equal to 31510-256=31254 |
CAP 3 – Using machine code
3.1 Printing a character in 64, 85, or 128 columns
The printing of a character in 64 or 85 columns is perfectly direct, evolving just the opening of the correct channel, followed by an RST 10h, the accumulator must have the code of the character we want to print. This character can be as shown next, a control character.
3.1.1 Printing in 64 columns
Channel #4 must be opened. This operation is made from a ROM routine in the address 1601h. This routine has as a parameter, the number of the channel to open, which must be in the accumulator. So to print the character !, ASCII code 21h, we would have:
LD A,4 ;the channel #4 is being opened
CALL 1601h ;channel opening
LD A,21h
RST 10h ;printing of the character !, in the actual line and columns
RET
3.1.2 Printing in 85 columns
Is equal to the above, simply now the channel #5 is used:
LD A,5 ;the channel #5 is being openned
CALL 1601h ;channel opening
LD A,21h
RST 10h ;printing of the character !, in the actual line and columns
RET
3.1.3 Printing in 128 or other number of columns
First is necessary to define a new character set, which in the case of 128 columns, must be defined in a 4×8 matrix. In any case, each character is always defined by 8 bytes.
The definition of each character is made like the UDGs, but in this case only the first 4 columns counting from the left, may be used to generate the character set (128 columns). This number 4 was found by dividing the 512 pixels of the resolution by the 128 columns (512/128=4 pixels).
After the character set is in memory, for example, in the address 50000, the system variables LARG and MAXCL, must be updated. LARG will contain 4 and MAXCL 128.
3.2 Using the control characters
The usage of the control characters is direct: open the channel, followed by a RST 10h. After the “printing” of the control character, the parameters will be sent by RST 10h too. For example, to make the same as PRINT #5; AT 10,50;”!”. we would have:
LD A,5 ;the channel opening is only made once
CALL 1601h
LD A,16h
RST 10h
LD A,10 ;line
RST 10h
LD A,50 ;column
RST 10h
LD A,21h
RST 10h
RET
The use of TAB is made the same way. The control characters INK, PAPER, and BRIGHT do not have effect.
3.3 Printing a string
The printing of a string is just a sequence of RST 10h. There is a routine in ROM that makes that work, in address 203Ch. This routine has as parameters the registers DE and BC, which have the address of the string and the length of the string. For example, the printing of a string in address 50000 and with length of 100 bytes, should be made in a next way:
LD DE,50000
LD BC,100
CALL 203Ch
RET
Note: the channel must be opened.
3.4 Printing of a numeric constant
For this, the ROM routine PRINT_FP in address 2DE3h is used. This routine prints the number at the top of the calculator stack. If we want to print a 2-byte number in 64 columns, for example, 28054, we must do:
LD A,4
CALL 1601h
LD BC,28054
CALL 2D2Bh ;put BC in the calculator stack
CALL 2DE3h ;PRINT_FP
RET
Adenda – Using FDD system
If you have a FLOPPY DISK DRIVE SYSTEM (FDD) from TIMEX, it’s advised to change the LOADER (BASIC_64) in the tape. With the FDD system turned on and Basic64 loaded in memory, type:
SAVE *”BASEST”CODE 31488,2000
followed by:
SAVE *”SETNM”CODE 23755,768
Then, execute MERGE “BASIC_64” to reload the LOADER from the tape. Then make a LIST , and erase lines 2 to 12. Enter the next line to the program:
12 LOAD *”BASEST”CODE
… and modify line 14 to:
14 RANDOMIZE USR 31488: OUT255,0: LOAD *”SETNM”CODE 23755
This time the LOADER is ready to be saved on a the disk. Execute:
SAVE *”START” LINE 12
… and Basic64 will start by pressing the reset button in the TIMEX FDD interface.